How to Secure Erase and Sanitize SSD for Free?

Protecting your data from threats is important but sometimes, it could be more important to properly erase it from our SSDs. Secure Erase is the process of properly erasing the data from an SSD so that it can never be recovered. Because the SSDs don’t delete the data directly once we manually delete it, it can be retrieved using the data recovery methods. Now, secure erasing an SSD means we are resetting everything and the data can’t be recovered in any way.

Most SSDs come with the software to securely erase SSDs but we are going to use the universal methods to do so. Also, the official software doesn’t allow you to change the type of secure erase as we will do in the upcoming sections. Secure erasing an SSD can be really simple if you perform it properly. In fact, all operating systems allow you to perform it and this is what we are going to do today.

How to Secure Erase an SSD How to Secure Erase and Sanitize SSD for Free?

Need for Secure Erase

SSDs read and write the data inside the units called pages. However, the smallest erasable unit is a block. Whenever we delete anything from the SSD, the whole block containing that data is erased. Now, SSDs come with a limited number of P/E cycles or Program/Erase cycles, and once surpassed, they can become unreliable and even unusable. So, in order to keep the erase cycles in check, SSDs don’t directly delete the files once we delete them from our computer. Even if we format our drive, the data is there but marked as invalid. Using a good data recovery method, invalid data can be recovered.

So, this could be an issue if you donate your drive or give your computer to somebody. To properly erase that data so that it can never be recovered, a process called secure erase is utilized. This is what we are going to discuss in this article in complete detail. So, let’s get started.

How to Secure Erase SSD in Windows?

How to Secure Erase an SSD Windows How to Secure Erase and Sanitize SSD for Free?

1. DiskPart Clean All Command

Using the DiskPart command in Windows, we can easily secure erase an SSD. This command can easily be run in the Command Prompt menu in Windows. The process is pretty easy to follow and is given below.

1. Open Command Prompt as administrator in Windows.
Open Command Prompt How to Secure Erase and Sanitize SSD for Free?
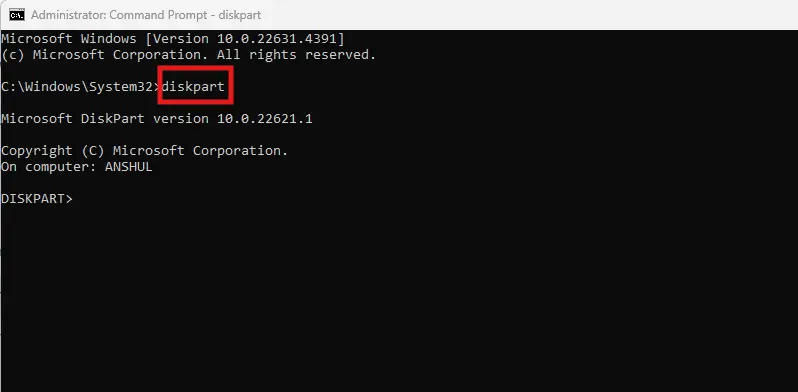
2.Type diskpart in the command prompt and hit Enter.
Type diskpart How to Secure Erase and Sanitize SSD for Free?
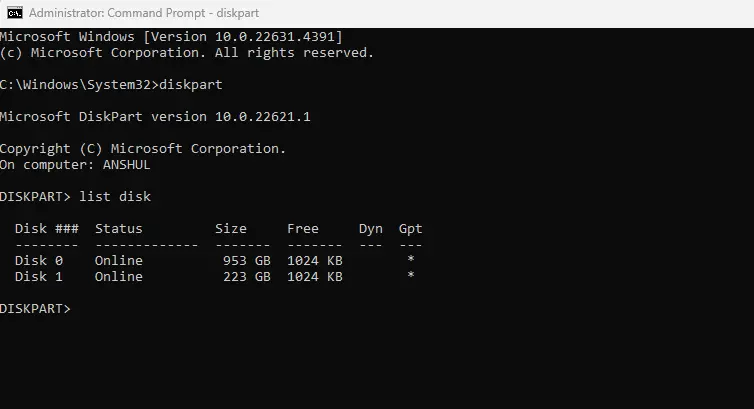
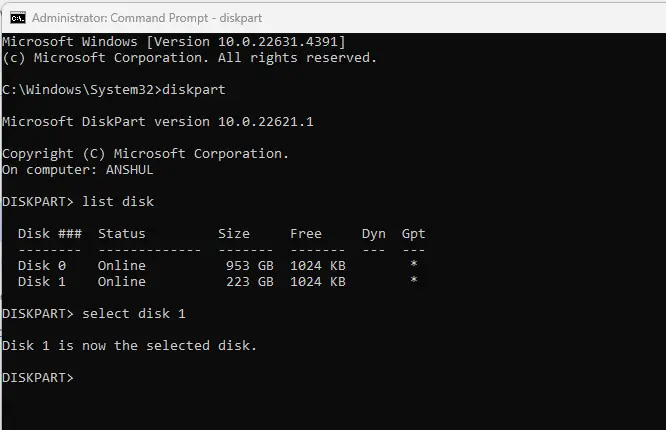
3.Type list disk and hit enter to see all the installed drives in your computer.
Type list disk How to Secure Erase and Sanitize SSD for Free?
4.Choose the SSD by typing select disk X. Replace X with the correct number of the drive i.e. select disk
Choose the SSD How to Secure Erase and Sanitize SSD for Free?
5.Type Clean all and hit Enter to wipe your SSD.

Note: This command would write zeroes to all the sectors inside your SSD. Any data whether deleted or not will be replaced with just the zeroes. If you want, you can perform this action multiple times to make sure you leave no chance of recovery. Normally, a single clean-all command is more than enough. Keep in mind that this isn’t a hardware secure erase which is much more reliable but is enough to make your deleted data completely unrecoverable.

2. Kill Disk (Third-Party Secure Erase)

1. Download the Kill Disk erase and wiper tool from here. Install the program and run it.
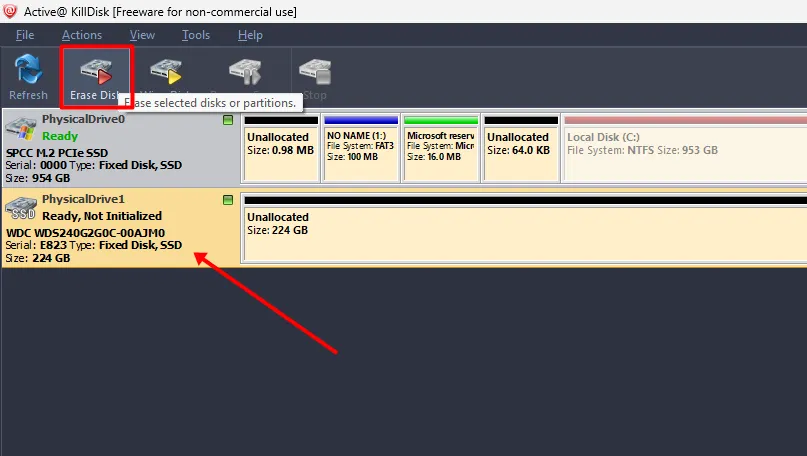
2.Select the drive you want to erase and click Erase on the top.
Select the drive How to Secure Erase and Sanitize SSD for Free?
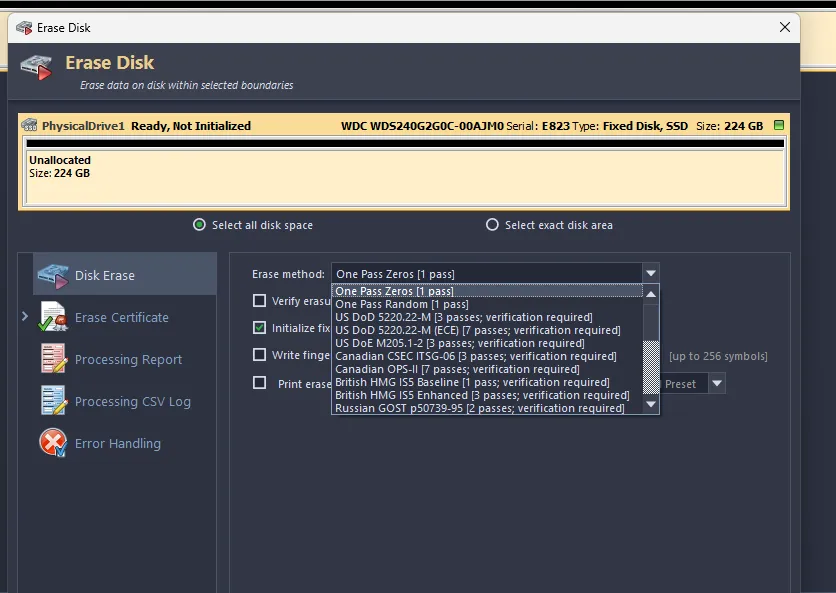
3.Choose the desired erase method. The free version would allow you to choose only One Pass zero method but with the paid plans, you can choose from different erase methods.
Choose the desired erase method How to Secure Erase and Sanitize SSD for Free?
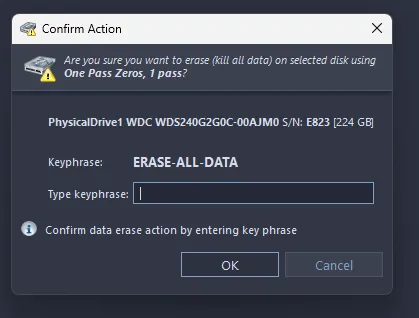
4.Next, you’ll have to confirm the action and once it’s done, the erase process will start and it can take a good amount of time depending on the size of your drive.
confirm the action How to Secure Erase and Sanitize SSD for Free?

How to Secure Erase SSD in macOS?

How to Secure Erase an SSD MacOS How to Secure Erase and Sanitize SSD for Free?

1. Secure Erase using Disk Utility

MacOS also allows you to securely erase your drive using the disk utility. You can use this method for both internal and external drives on your MacOS. The best thing is that it is simple to use and you don’t have to install any external software. This is how you can perform it.

Make sure to enable FireVault encryption as it will make your data 100% unrecoverable once erased. To do so, go to System Preferences > Security & Privacy > FileVault. Turn On the FileVault and it will encrypt the data before you proceed.

1.Open the Disk Utility menu in your macOS
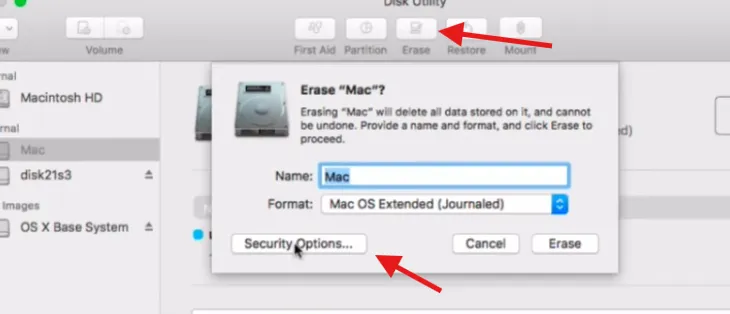
2.Select your desired drive and click the Erase option at the top.
3.Then click Security Options.
click Security Options How to Secure Erase and Sanitize SSD for Free?
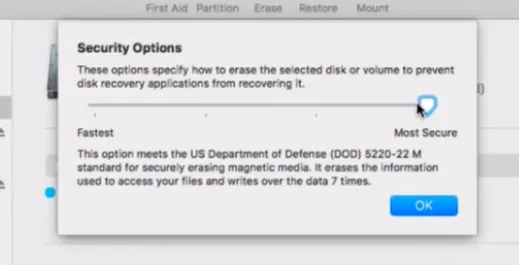
4.On the next page, select the desired level of erasure. Do not keep it at the fastest as this can leave some room for data recovery. However, going for extremes can properly clean your drive.
select the desired level of erasure How to Secure Erase and Sanitize SSD for Free?

2. CCleaner (Free Third-Party Secure Erase)

If you find the official method too intimidating, you can simply use the free software called CCleaner. It has a secure erase feature for the SSDs and HDDs and it works on the macOS. The process is as follows.

1.Download and install the CCleaner program from here. Then run the program.
2.In the main menu, click Tools and then Drive Wiper.
click Tools and then Drive Wiper How to Secure Erase and Sanitize SSD for Free?
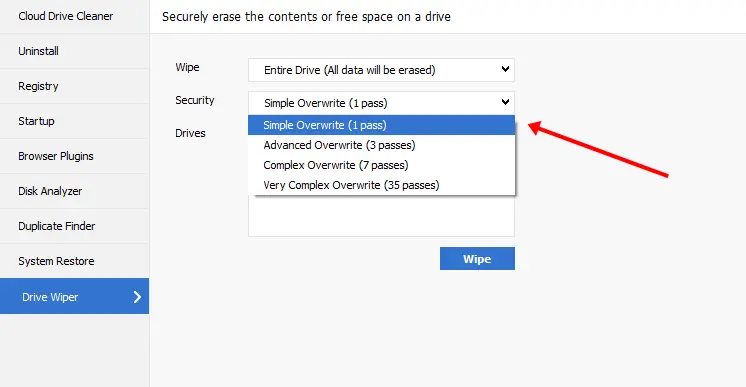
3.Choose your drive to be erased and select the overwrite method from the dropdown.
Choose your drive to be erased How to Secure Erase and Sanitize SSD for Free?

Just click wipe and the secure erase process will start. Again, the time taken for the erasure will depend on your drive’s size.

How to Secure Erase SSD in Linux?

How to Secure Erase an SSD How to Secure Erase and Sanitize SSD for Free?

The Linux operating system also has a built-in feature to erase SSDs securely without using any third-party software. However, you’ll have to use different commands based on the type of SSD i.e. SATA or NVMe. Let’s see how you can do it.

Identify the type of your SSD

  • Run this command and check the type of your SSD: lsblk
  • In return, you will see the type of your SSD in this way:  (/dev/sda for SATA or /dev/nvme0n1 for NVMe)

Use ATA Secure Erase for SATA SSDs

In order to use this step, you’ll have to install hdpram utility. This can be done using a few commands in the terminal. Below is the process.

  • Install the hdpram utility by running this command:

sudo apt install hdparm

  • Check your drive’s security status by running this command:

sudo hdparm -I /dev/sdX | grep “not frozen”

Make sure to replace /dev/sdX with your SSD identifier (e.g., /dev/sda). If it says “frozen,” you’ll have to suspend and resume your computer to unfreeze the drive.

  • For the secure erase process, you’ll have to set a password for your drive which can be done with this command:

sudo hdparm –user-master u –security-set-pass password /dev/sdX

  • Finally, you can execute the secure erase using this command:

sudo hdparm –user-master u –security-erase password /dev/sdX

Once the secure erase process is done, you can verify by re-running the lsblk or hdpram and confirm if the drive is completely blank.

Use NVMe Secure Erase for NVMe SSDs

  • Install the nvme-cli by running this command in the terminal:

sudo apt install nvme-cli

  • Simply run the secure erase command like this:

sudo nvme format /dev/nvme0n1 –ses=1

  • Run the sanitize command:

sudo nvme sanitize /dev/nvme0n1 -a 2

Note: Make sure to replace /dev/nvme0n1 with your NVMe drive identifier.

Secure Erase vs Sanitize vs Physical Drive Destruction

Most people would find the secure eraser to be more than enough to properly clean any data from their drives. But, the Sanitize command which runs only with the NVMe drives will remove the over-provisioning data which the secure erase would not. Sanitize is the comprehensive erasure method used in highly sensitive cleaning methods. Secure erase is sufficient in most scenarios but sanitization is good if you perform it. Some people would also physically destroy their drives which isn’t necessary. But, if that gives you peace of mind, it could be a solution for some people.

Why format isn’t enough?

A simple SSD format is enough to free up the space in your SSD and use it for anything else. But, if you think that the data is permanently gone once you format your drive, you are wrong. As we discussed earlier, the data is marked as invalid when deleted or formatted. However, the state of the NAND flash memory cells is the same and can be interpreted almost completely to recover the deleted data.

The secure erase simply means we manually write the data to each memory cell to a specific data (mostly random data or 0’s). Once this data is written, the previous state of the cells is gone and can never be recovered using any possible method. However, secure erase keeps the over-provisioning space which anyway generally doesn’t have any useful information. But, with the sanitization, you can get rid of that extra space and clean your drive completely.

結論

I hope these methods will help you properly secure and erase your SSDs without any issues. Most people have issues choosing the right erase pass. I think the basic 0’s are enough. But, do not go for more than 3 passes as it will do unnecessary wearing to your drive. If you have any issues using the terminal or the OS-supported erase methods. There are many free software which would help you securely erase your SSDs.

トップに戻る

お問い合わせ

下記のフォームにご記入ください。

コンタクトフォーム製品